Introduction
Unfortunately you can face sometimes a Bluescreen of Death (BSOD) after installing an unsupported driver or if a driver is outdated. If you have not seen a Windows Bluescreen yet, it looks like this. I want to show you how to Windows 10 Analyze Bluescreens BSOD
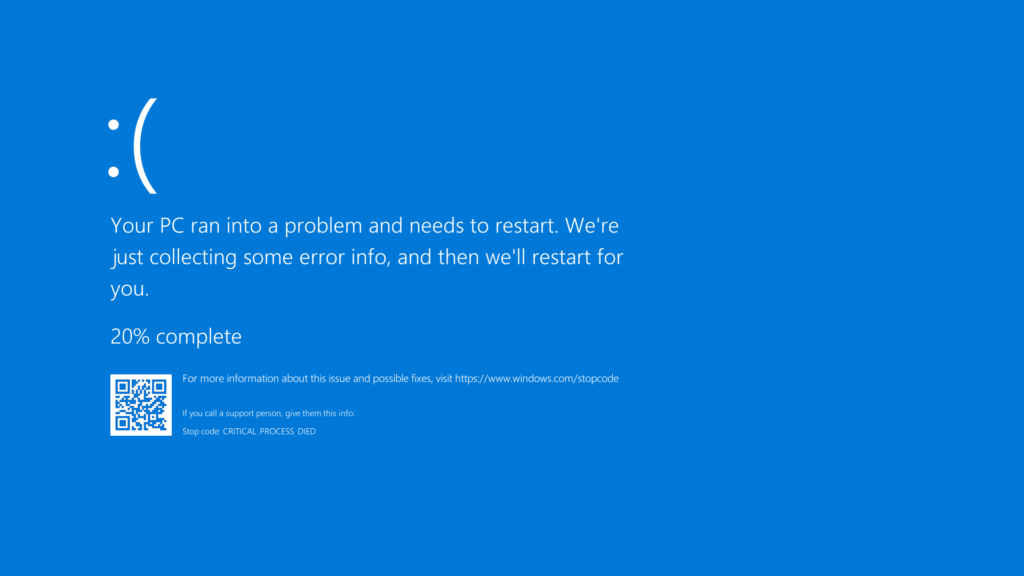
Image Source: https://en.wikipedia.org/wiki/Blue_screen_of_death#/media/File:Bsodwindows10.png
In a really bad scenario, the BSOD can even cause a boot loop of your device. Windows starts, and before the lockscreen is visible, you get the Bluescreen. It generates the log information and reboots. Then the same procedure applies again and again. In such a case, you will need to use Safe Mode from Advanced Boot Options, but I will come back to this later.
As a first step, I recommend you to update all drivers and your system’s BIOS in case you did not install any third-party application or driver. You can download them from you manufacturer’s website or if you own a business laptop, there might be a tool to download and install all of them at once (like DELL Command Update or HP Support Assistant).
BluescreenView
The first tool I recommend to get started analyzing Bluescreens is called BluescreenView which is available here for free. Simply download it, there is no installation needed. When you download the zip archive, extract it and start the .exe file:
If you are running the application, it will automatically list all of your Bluescreen Logs which are documented as Minidumps. As my current system had no bluescreens yet, this is an example found on another website to show you how it looks like:
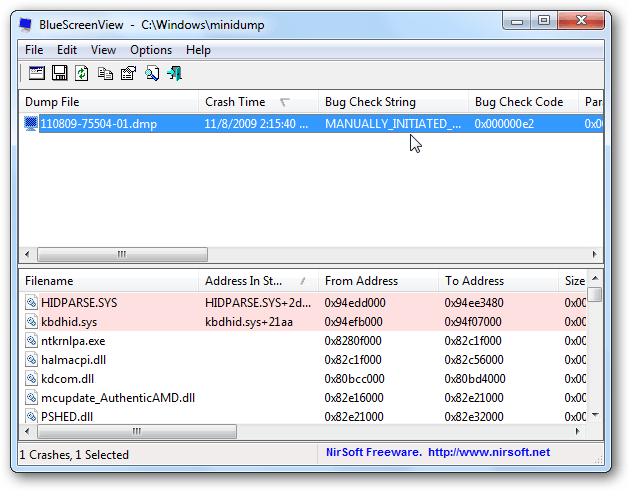
Image Source: https://www.howtogeek.com/howto/6292/how-to-troubleshoot-the-blue-screen-of-death/
The application shows you very important information. You will need the following for further investigation of the error:
- Bug Check String
- Bug Check Code
- Drivers found in stack
With this information available, you can start looking up the different combinations on your favourite search engine. Probably you will find the cause and update the related driver from your manufacturer’s website. If there is nothing displayed despite you got a BSOD, please make sure the Minidumps are enabled in Advanced System Settings:
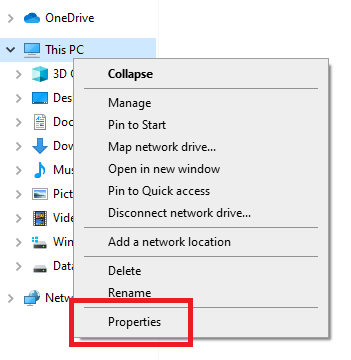
1.) Open File Explorer, right-click on This PC and select Properties
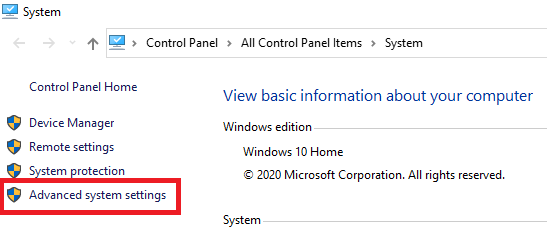
2.) Open Advanced System Settings
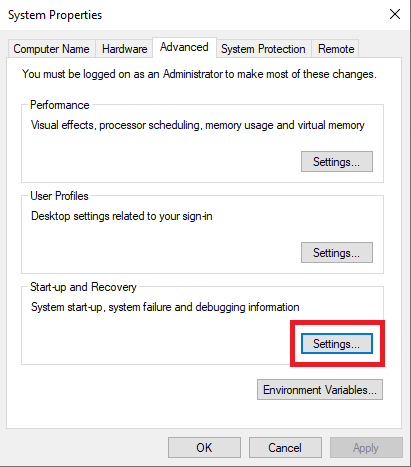
3.) Select Settings for Start-up and Recovery
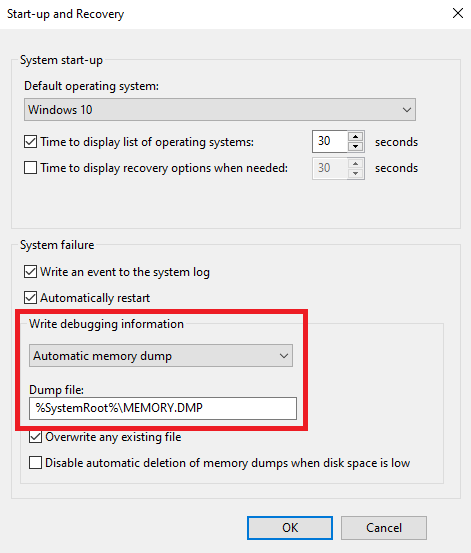
4.) Make sure that you configure Automatic Memory Dump and check the Dump File Location
Windows 10 Safe Mode
Sometimes, especially in case of an endless boot loop, you will need to enter Windows 10 Safe Mode. This means, that only basic drivers and settings are loaded because they will not probably cause any bluescreen. There are several ways to get into Safe Mode. If your system still starts properly, you can simply hold Shift and click on Restart on your lockscreen. If it is not booting anymore to lockscreen, you need to manually shutdown your device. After it’s starting again, maybe you need to do this one more time. Lately after three unsuccessful starts, it should boot into the Recovery Environment. You can find the whole documentation at Microsoft Support
1.) Select Troubleshoot
2.) Select Advanced Options
3.) Select Startup Settings
4.) Confirm with Restart
At the last screen with the Safe Mode options, select Option 5: Safe Mode With Networking
Image Sources: https://support.microsoft.com/en-us/help/12376/windows-10-start-your-pc-in-safe-mode
If you need to uninstall an application in Safe Mode, you need a little Registry tweak, because the Windows Installer Service is not running per default. Start a Command Line Window as Administrator and copy the following command to add the following registry key:
REG ADD "HKLM\SYSTEM\CurrentControlSet\Control\SafeBoot\Network\MSIServer" /VE /T REG_SZ /F /D "Service"
After that, type in the same CMD window this command:
net start msiserver
After that, you are able to uninstall any application via Control Panel. This is extremely useful, because BSODs are often caused by newly installed third party applications which might have installed additional drivers.
Windows 10 Analyze Bluescreens BSOD
Driver Verifier Manager
The Driver Verifier Manager is another tool to find the driver causing BSODs on your device. Please keep in mind that using this tool can result in an unexpected behaviour with new Bluescreens! Nevertheless it is a useful tool in my opinion, thus I want to show you how you can use it.
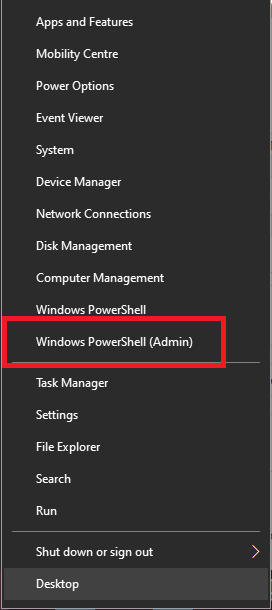
1.) Start Windows PowerShell as Administrator by right-clicking on Windows icon on the bottom left
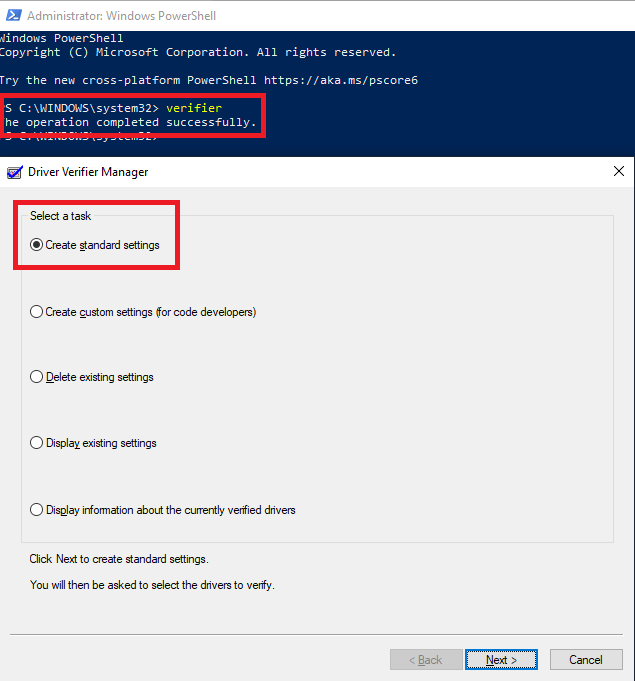
2.) Type in verifier and hit Enter
Create Standard Settings
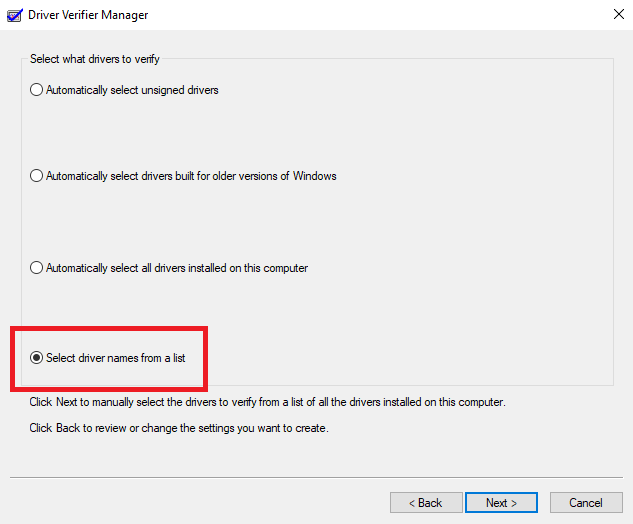
3.) Select driver names from a list
4.) Here I recommend you to select all non-Microsoft drivers as a first step.
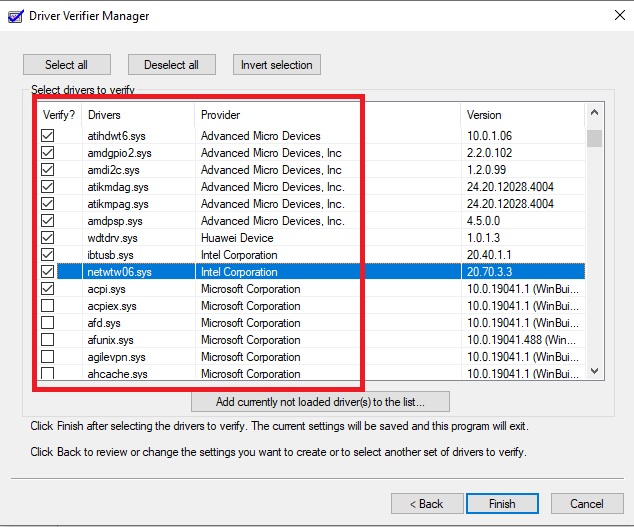
After hitting Finish, you will get the message that these settings will be applied after next reboot. So, time to reboot now. Most probably, your system will be able to start normally into Windows because the faulty driver does not get loaded now. If you execute the Driver Verifier Manager now and select Display Information about the currently verified drivers, you will get a list of verified drivers and if they are loaded or not. Another thing which could happen is that Driver Verifier Manager creates new Bluescreens which contain more detailed information about the faulty driver causing the BSOD. Thus it is more easy for you to narrow down the root cause and eliminate the driver.
In most cases I am able to solve the issues with these methods – if you have any more methods or solutions, let me know in the comments 🙂
Windows 10 Analyze Bluescreens BSOD


